Firstly, let me talk about the Vernier Caliper.
"The main use of the vernier caliper is to measure the internal and the external diameters of an object." Here is a picture of a Vernier Caliper.

Here are the parts of the Vernier Caliper and their functions.
1. Outer Jaws: For measuring the external diameter of objects.
2. Inner Jaws: For measuring the internal diameter of objects.
3. Vernier Scale: "A vernier scale is a device that lets the user measure more precisely than could be done by reading a uniformly-divided straight or circular measurement scale. It is scale that indicates where the measurement lies in between two of the marks on the main scale."
4. Depth Probe: To measure the depths of objects.
Here is a video on how to use the Vernier Caliper.
How a Vernier Scale works.
"The vernier scale is constructed so that it is spaced at a constant fraction of the fixed main scale. So for a decimal measuring device each mark on the vernier is spaced nine tenths of those on the main scale. If you put the two scales together with zero points aligned, the first mark on the vernier scale is one tenth short of the first main scale mark, the second two tenths short, and so on up to the ninth mark—which is misaligned by nine tenths. Only when a full ten marks are counted is there alignment, because the tenth mark is ten tenths—a whole main scale unit short, and therefore aligns with the ninth mark on the main scale."

A typical Vernier Caliper can measure 0.1mm readings and has a typical maximum accuracy of +0.05mm.
Now I will be introducing you to a far more complex instrument that has a maximum accuracy of +0.005mm! It is the Micrometer Screw Gauge.
"A micrometer, sometimes known as a micrometer screw gauge, is a device incorporating a calibrated screw widely used for precise measurement of components in mechanical engineering and machining as well as most mechanical trades, along with other metrological instruments such as dial, vernier, and digital calipers. Micrometers are usually, but not always, in the form of calipers (opposing ends joined by a frame), which is why micrometer caliper is another common name. The spindle is a very accurately machined screw and the object to be measured is placed between the spindle and the anvil. The spindle is moved by turning the ratchet knob or thimble until the object to be measured is lightly touched by both the spindle and the anvil."
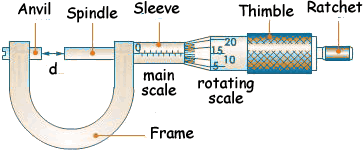
Here are 2 pictures of the Micrometer Screw Gauge.

Here is a video on how to use the Micrometer Screw Gauge. Enjoy!
Here are the parts of the Micrometer Screw Gauge as found on Wikipedia.
The frame is heavy and consequently has a high thermal mass, to prevent substantial heating up by the holding hand/fingers. It is often covered by insulating plastic plates which further reduce heat transference.
Explanation: if you hold the frame long enough so that it heats up by 10°C, then the increase in length of any 10 cm linear piece of steel is of magnitude 1/100 mm. For micrometers this is their typical accuracy range.
Micrometers typically have a specified temperature at which the measurement is correct (often 20°C [68°F], which is generally considered "room temperature" in a room with HVAC). Toolrooms are generally kept at 20°C [68°F].
I will start off with Zero Error for the Micrometer Screw Gauge. Here is a picture.

Positive zero error
The error is +x mm. To correct the reading, we subtract the error from the measurement.
Negative zero error
The error is -(0.1-y) mm. To correct the reading, we subtract the error from the measurement.
Now I will continue with zero errors for the vernier caliper.

"In a vernier caliper, you can either have a positive zero error or a negative zero error if the zero of the main scale does not coincide with the zero of the vernier scale. If the zero mark is slightly on the right side of the zero on the vernier we have a positive zero error. If it is on the left, then a negative zero error. To get the correct reading, the poistive zero error is subtracted from the final reading and the negative Z.E is added."
No comments:
Post a Comment